Reposition a Saved Design
*Before shutting down your machine, mark where your next row or block will begin. You can do this by dropping your needle there or placing a pin or some other mark.
1.1 Position Your Machine
- Move your machine so your needle is positioned where the start point of the next row and drop your needle.
- *If the needle was dropped at the start point before shutting down, you do not need to move your machine.
1.2 Open Your Saved Design
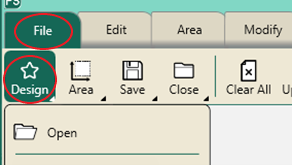
- Select File tab.
- Press Design on the ribbon.

- Your saved design will be the first on the dropdown menu.
- Press Baseline.
1.3 Position Start Point
- Select Pro-Stitcher tab.
- Press New Start & End on the ribbon.

- There are two columns in the sidebar: Start and End.
- At the bottom of the Start column, under the word Jumps, press the down arrow until the green start point is on the desired row.

1.4 Reposition the Design
- Select Modify tab.
- Press Reposition on the ribbon.

- Select Start Point in the sidebar.

*This will position the start point of the design at your crosshairs.
- To fine-tune your design positioning, move your crosshairs (your machine) to the lowest point in the middle of the row already quilted and check alignment.
- Use the Zoom tool from the workspace tools to zoom in on a point.
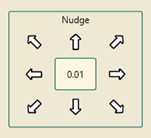
- Use the nudge buttons if needed from the sidebar.

**Note** If you are leaning on the poles of your frame during this process it can change the alignment of the quilt.
1.5 Stitch the Design
- Select Pro-Stitcher tab.
- Press Quilt on the ribbon.
- Press Run. Verify Settings.
- Press Proceed. Machine will take one stitch and pause.
- Pull up bobbin thread.
- Press Resume. Stitch design.
Reposition Designs
You can reposition a design in many ways using the Modify tab > Reposition tools.
2.1 Start Point
- Select Modify tab.
- Press Reposition on the ribbon.

- Select Start Point in the sidebar.

*This will position the start point of the design at your crosshairs.
- Select Current Point to move the current point (paused gold circle) to the crosshairs.
- Select End Point to position the end point of the design at the crosshairs.

2.2 Drag and Drop
Try using Drag/Drop without dropping your needle.
- Looking at the screen, move your crosshairs to a point in a design.
- Press Drag (on the ribbon or in the Quick Access toolbar).
- Looking at your quilt, move your needle to the corresponding point in the pattern you’ve stitched.
- Press Drop. Design is repositioned.


2.3 Crosshair Quadrants
Try using the quadrants of the crosshairs.
- Select Modify tab.
- In the sidebar, select the different options to position your design.

2.4 Nudge Buttons
- Use the nudge buttons to finetune design position. To change the nudge increment, tap the box in the center and type in the desired amount, then tap enter.
